Printer's bleed and trim
I’ve recently been involved in assembling a book for publication by Kindle Direct Publishing (formerly CreateSpace) and found that the descriptions of bleed and trim in their documentation remain as confusing for some as they were several years ago when I last did this. While trying to work through this I came up with my own explanation which others might (or might not!) find helpful.
The top-left corner of a page with bleed needs to have the trim set like this:
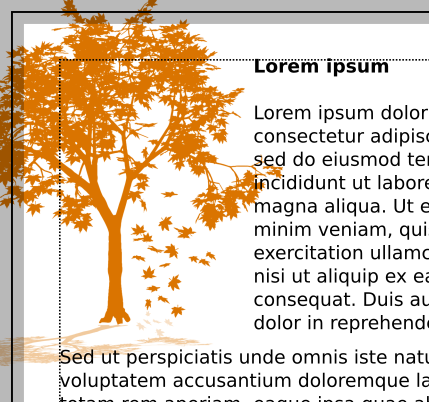
In this illustration we can see these things (which should not appear on your actual pages):
- Solid black line Indicates where we expect the physical edge of the page to be when the book is printed. This is where you would set the edge of your page in your document if no bleed were required. In an ideal world the edge of the page would actually be here and you would be able to just position illustrations against this line and expect that they would run up to the edge of the page when printed. Unfortunately it’s not that simple.
- Grey border Shows the area in which physical edge of the page might actually be after it is trimmed during printing. The final page could be cut anywhere in this area because the cutting machines are not 100% precise in operation. This area extends 0.125 inches (about 3.2mm) either side of the desired edge of the page. Because of this variability it is essential to be sure that no important part of any illustration falls anywhere in or near this area, and ideally not outside the margin (see below). The illustrations should however cover all of this area to ensure that they will extend right to the edge of the page when the finished book is trimmed, regardless of where in this area the actual final trim falls. This means that illustrations should be designed with material around the edges which enhances them without containing anything that can’t be lost.
- Dotted line Represents the margin position marking the extent of valuable content on the page. All text and all important image content should fall inside this line. It is generally accepted that for good page design this should be a fair distance from the edge of the page, typically around 10% of the smallest page dimension, so that the physical page edge does not interfere with the page content when the book is being read.
All of this means that if any of the pages in your book contain images that are intended to bleed right to the edge of the paper then the actual paper size must be increased throughout the whole book by 0.125 inches on the top, bottom and outside edges to make room for this, and that the design should account for the possibility of up to 0.25 inches being lost on any of these edges. Note that the inside edges (i.e. the right edges of even-numbered pages and left edges of odd-numbered pages) do not need this extension because they already have extra space to make room for the binding. It is still necessary to make sure that bleed illustrations extended right to these edges and that important content remains inside the margins because these edges will still, of course, be trimmed and will also be partially obscured by the binding because the finished book cannot be fully opened flat without breaking the binding.
Note that the most common book layouts have illustrations that bleed to the edges of the “page” on the covers but not on any other pages. This is why the cover is typically supplied as a separate file from the remainder of the book - it means that the extended page size is required only for the cover file and not for the main book file, which might be created by software that makes it more difficult to do this.
Merlyn Kline
September 2020